- Featured Product: Online Payments (Stripe)
- Meet Moveware
- Getting Started
- Jobs
- The Job Life Cycle and Statuses
- Jobs – Search
- Jobs – Details
- Jobs – DSP
- Jobs – Diary
- Jobs – Contact
- Jobs – Costing
- Jobs – Costing Interface
- The Costing Life Cycle
- Add a Cost Option
- Add Estimated Costs and Suppliers in Costing
- Add a Sell Price in Costing
- Add a Cost Line to a Cost Option
- Print a Quote for a Cost Option
- The Status Q Cost Option
- Modify the Cost Option Details
- The Option Total Line
- Add Actual Costs and Post a Purchase
- Accruals in Job Costing
- Multiple Currencies in Jobs Costing
- Enter Foreign Currency Costs and Sell Prices
- Add an Additional Cost Option
- Combine Cost Options
- Misc Job Types Costing
- Cancel a Cost Option
- Change a Cost Option Customer (Debtor)
- Change a Supplier (Creditor) of a Costing Line
- Set a Costing Line as No Charge
- Set a Cost Option as No Charge
- Create a Costing Credit Note
- Internal Resource Costs
- Jobs – Costing Fields
- Jobs – Invoicing
- Jobs – Invoicing Interface
- Create an Invoice in Jobs
- Modify Invoice Header Information
- Modify Invoice Charge Lines
- Invoice One Total Line
- Post an Invoice in Jobs
- Print an Invoice in Jobs
- Unlink an Invoice from a Cost Option
- Add a Credit Note
- Add an Additional Invoice
- Partial Invoicing
- Jobs – Invoicing Fields
- Jobs – Inventory
- Jobs – Resources
- Jobs – Import / Export
- Jobs – Waybill
- Jobs – Storage
- Jobs – Review
- Jobs – Claims
- Job Folder
- Baggage
- Fine Art
- Corporate (CRM)
- Sales
- Daily Diary (Operations Diary)
- Operations Diary Icons and Filters
- Operations Diary Notes
- Allocate Resources in the Operations Diary
- Close a Day from the Operations Diary
- Confirm Start Times
- Diary Actions in the Operations Diary
- Print the Operations Diary
- SMS Messages in the Operations Diary
- Enter Actual Times in the Operations Diary
- Operations Diary – Planner Tab
- Organizer
- Waybills
- Operations
- Full Screen Dispatch
- Container Movements
- Crates
- Destination Summary
- Fleet
- Inventory Management
- Labels
- Asset Management
- Object Management
- Resource Usage
- Start Times
- Timesheets
- Workload
- Diary Messages
- International
- Quality
- Storage
- Storage Management
- Storage Invoicing
- Storage Rate Revision
- Storage Locations
- Warehouse Management
- Customers
- Customer Management
- Customer Ageing
- Combined Invoicing
- Customer Approval Setup
- Invoicing
- Invoice Update
- Receipting
- Receipt Listing
- Receipts Import
- Van Line Clearing
- Suppliers
- Supplier Management
- Purchases
- Create a Manual Purchase Invoice
- Apply a Purchase Invoice to a Job
- Apply a Purchase Invoice to a Waybill
- Apply a Purchase Invoice to an Inventory
- Assign a Purchase Invoice for Approval
- Cancel a Purchase Invoice
- Email a Purchase Invoice
- Purchase Invoicing in Foreign Currency
- Modify a Purchase Invoice
- Place a Purchase Invoice on Hold
- Print a Purchase Invoice
- Reverse a Posted Purchase Invoice
- Search for a Purchase Invoice
- Purchase Event Log
- Purchase Approval
- Purchase Update
- Purchase Import / Export
- Accruals Management
- Payments
- Payment Batch
- Payment Listing
- Purchase Orders
- Contra Accounts
- Subcontractor Payments
- General Ledger
- Chart of Accounts
- General Ledger Setup
- General Ledger Inquiry
- General Ledger Journals
- General Ledger Accounting Close Date
- Budgets
- Sales Budgets
- Tax Return Module
- Banking
- Employees
- Employee Management
- Employee Payroll
- Employee Payroll Update
- Employee Payroll Admin
- Single Touch Payroll
- STP Phase 2 – Quick Start Guide
- STP Phase 2 – FAQ
- Moveware STP Configuration
- STP Workflow
- STP Reporting
- STP Corrections
- STP Data Export Fields and Requirements
- Administration
- Moveware Setup
- Bank Accounts
- Branch Management
- Calendar Management
- Codes Management
- Company Management
- Cost Centres
- Destinations
- Diary Actions
- Diary Messages
- Internal Phone Book
- Inventory Management
- Inventory Management – Containers
- Inventory Management – Crates
- Inventory Management – Furniture
- Inventory Management – Labour
- Inventory Management – Office Equipment
- Inventory Management – Other
- Inventory Management – Packing Materials
- Inventory Management – Storage
- Inventory Management – Vehicles
- Inventory Management – Vessels
- Job Products
- Job Types Management
- Locations
- News and Information
- Paragraph Management
- Ports Management
- Postcodes
- Rates Management
- Review Setup
- Sales Representatives
- Supplier Products
- Tax Codes
- Waybill Payment Messages
- Web Setup
- System Setup
- Codes
- Error Log
- Event Log
- Groups
- Menu Management
- MoveConnect
- MoveConnect Log Viewer
- Remote Printers
- Report Configuration
- Security Management
- System Settings
- System Start Numbers
- System Parameters
- User Management
- Mobi Setup
- Keeping Mobi Updated
- Set Up Employees to Use Mobi
- Configure Mobi Settings
- All Mobi Settings
- Language Setup
- Configure Pre-Set Paragraphs
- How to Customize Menus, Reports, and Reviews in Mobi
- Editing Inventory Item Button Ribbon
- Customize Mobi Inventory Buttons
- Defaulting Methods in Mobi
- Mobi Barcoding
- Configuring Mobi Costing Menu
- Send E-mails from Mobi
- How to Activate Mobi Automatic E-mail/SMS
- Set up a Feedback Form
- Exporting Data Out of Mobi
- Utilities
- Reports
- Generate Reports
- Set a Custom Report
- Print Reports
- Schedule Reports
- Configure Reports
- Reports – Favourites
- Reports – Sales
- Reports – Export
- Reports – Import
- Reports – Operations
- Reports – Storage
- Reports – CRM (Corporate)
- Reports – Customers
- Reports – Suppliers
- Reports – General Ledger
- Reports – Employees
- Reports – Analysis
- Reports – Other
- Reports – Schedule
- Moveware Applications
- MobiCrew
- Download and Log Into Mobi (MobiCrew)
- Sync Information in Mobi
- Mobi Interface and Menus
- Mobi Jobs
- Search Screen
- Summary Screen
- Notes Screen
- Addresses Screen
- Diary Screen
- Messages Screen
- Status Screen
- Inventory Screen
- Mobi Vehicle Receipting and Condition Reporting
- Materials Screen
- Manage Materials
- Costing Screen
- Client Signoff
- Reviews Screen
- Print Screen
- Check Off Screen
- Timesheet
- Download Screen
- Vehicle Documents
- Mobi Warehouse
- Mobi Fine Art
- Mobi Submit Feedback Menu
- MobiSurvey
- Online Payments
- MoveSurvey
- MoveSurvey Setup
- Install MoveSurvey
- MoveSurvey Wizard
- MoveSurvey – Import Onto Another Device
- Moveware Codes for MoveSurvey
- Set up MoveSurvey Users
- Set up Job Products for MoveSurvey
- Set up Inventory for MoveSurvey
- Moveware reports in MoveSurvey
- Run MoveSurvey
- Enabling the Camera Permissions in MoveSurvey
- Uninstall MoveSurvey
- Using MoveSurvey
- MoveSurvey Main Menu
- Synchronise Data in MoveSurvey
- MoveSurvey – Search
- MoveSurvey – Details
- MoveSurvey – Notes
- MoveSurvey – Diary
- MoveSurvey – Inventory
- MoveSurvey – Review
- MoveSurvey – Resources
- MoveSurvey – Account
- MoveSurvey – Client Summary
- MoveSurvey – Reports
- MoveSurvey – Tools
- MoveSurvey Photos & Attachments
- MoveCrew
- MoveCrew Setup
- Using MoveCrew
- MoveSMS
- MoveTransfer
- Portal
- Web Portal – Moveware Admin Guide
- Web Portal – Move Manager Guide
- Web Portal – Client Guide
- Web Portal – Online Quote
- Web Portal – Partner Guide
- Third Party Interfaces
- 1-Stop
- A3
- ABF
- Adobe Sign
- ADP Payroll
- Allied Van Lines Canada
- Altair
- ANZ
- Ariba
- Australian ABA File
- Bambora
- Bank of NZ
- Bekins Van Lines
- Canadian Banking Files
- Cargowise
- Compare Quotes
- Credit Cards
- CustomsController
- Daycos
- Dimensions (Access)
- Dynamics Business Central
- Dynamics Navision
- EasyDPS
- eMyLeads
- Enterprise
- Exactus
- Exact
- Ezidebit
- FMS
- Fuel Card Interfaces
- Great Plains
- Happy to Serve
- Harmony
- Hockingstuart
- IBS
- ISF Integration
- LogiX
- Make Tax Digital
- Manpack3
- Maximizer
- Moving24
- MSP
- MVF / MoveHub
- MyDHL+
- NAB Transact
- NEDVAN
- NES (National Export System)
- New Zealand Banking File
- New Zealand Defence Force
- New Zealand Ministry of Education
- New Zealand Police
- OFAC
- Orphee (Groupage)
- Parsifal PRISM
- Pasha
- Podium
- Quickbooks
- RHA
- Royal Mail PAF
- Royal Wolf
- Sage
- SAP
- SAP Ariba
- SCF
- SEPA File
- South African Banking Files
- SuperStream
- Techmate
- Trackfreight
- TriGlobal
- Twilio
- UK BACS File
- U.S. Bank – Multi Payment Export
- U.S. NACHA File
- Visma Global
- Weichert
- Westpac NZ
- Westpac (PayWay)
- Worldpay
- World Office
- Wheatons Van Lines
- Xero
- Moveware Hosting Platform
- Infrastructure Setup
- Moveware Infrastructure Setup
- Product Requirements
- Recommended Settings for Windows Desktop Resolution
- General Settings
- Install Moveware Client on Terminal Server or Workstation
- Install Crystal Reports Runtime Files (Manually)
- Install Moveware PDF (Manually)
- Moveware Database Setup
- Database Client Tools
- Disaster Recovery
- Moveware System Security
- Moveware System Backup
- Moveware System Restore
- Ransomware
- Set up a Microsoft Scheduled Task
- Set up a Moveware Database and Backup Procedure on a Client’s Server
- Windows Update Settings
- Windows Virus & Ransomware Protection
- Glossary
- Help and Support
Using the Grid tab in the Location Management module is another way of viewing and managing storage locations in Moveware. It also provides a visual alternative to the standard list of locations located in the Locations tab.
How to Manage the Storage Locations Grid
In the Storage Location management window, select the Grid tab:

You will be shown the grid view:

- A. The Agent(s)
- B. The Area(s)
- C. The Row(s)
You will also notice the numbering of the columns and rows on the grid on the right

- D. The H (Height) of the row
- E. The D (Depth) of the row
- F. This is the specific location that you can interact with (i.e. add a container or move a container)
How to Add Containers to the Grid
Step 1
Double click on the available slot.

Step 2
You will be presented with a pop up that shows the available storage containers.
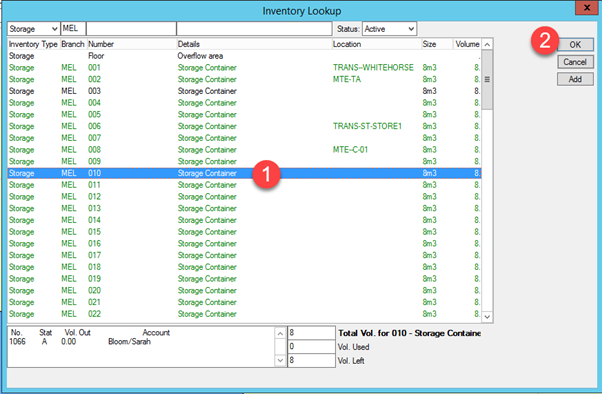
- Select the container.
- Press OK to confirm your selection.
Your selection will be reflected on the grid.

Note: If a container is already allocated to another grid location you will see an error if the system parameter “Stop Validation of Container Relocation in Storage Grid” is set to “N”

Otherwise if your system parameter “Stop Validation of Container Relocation in Storage Grid” is set to “Y”, you will get the following warning:

Now that the container has been added to the location, note how the colour changed from green to grey. The legend at the bottom of the screen describes the meaning of each colour:

How to Move the Storage Container

- Double click on the container.
- Press the Move Button (Blue arrow).
- Select the storage location you want to move it to.
- Press OK to confirm your selection.
Alternatively, if the System Parameter “Enables the ability to move/relocation storage items in Location Management” is given a Value of Y, this allows you to double-click on a container in a grid and then double-click it in another location to move it there. If the destination location is populated with another container, the 2 containers would swap locations.
Step 1

Step 2

- Double Click on the container.
- Double click on the container you want to swap.
- Press Yes to confirm the swap.
You can now see that 015 and 016 have swapped locations.

How to Move a Container to a Position for a Job
Moveware has a “Grid Shuffle” feature which can be activated by setting the System Parameter “Allows Location Grid Shuffle” to have a value of “Y” (to shuffle to the back/left) or “F” (to shuffle to the front/right.
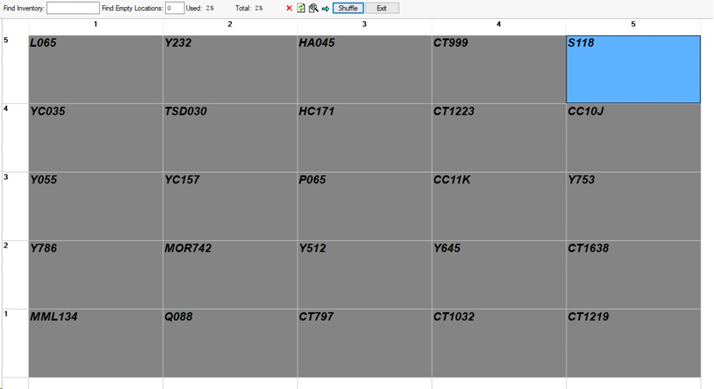
Let’s say you want to Move S118 out of store and it is stuck at the very bottom of a 5×5 row, simply click on it and then click the ‘Shuffle’ button:

The system will automatically shuffle the grid so that this container is placed at the outer-most location and all other blocking containers are shuffled back one space:
In this scenario, the user wants to move the bottom container in (1-1) as it is coming out of storage early.
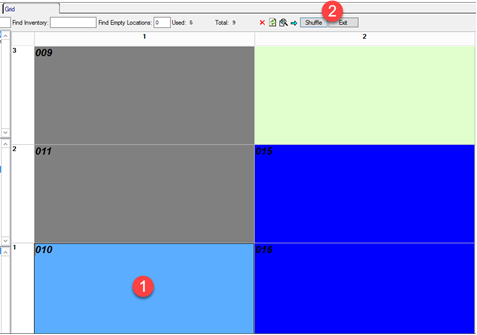
- Select the container location.
- Press the Shuffle button.
The container moves to a position where it can be removed from the stack.
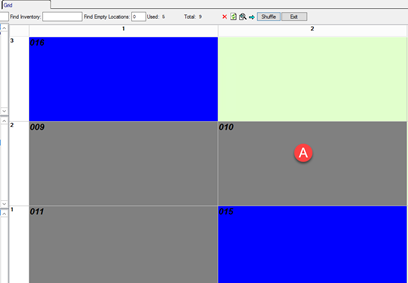
Locations Holding Area
Moveware also provides an option of having a Holding Area on the right side of the screen.
Assign the System Parameter “Activate Holding Area in Location Grid View” to a value of Y to activate it. Once Activated, follow the instructions belowto move a container to the Holding Area:
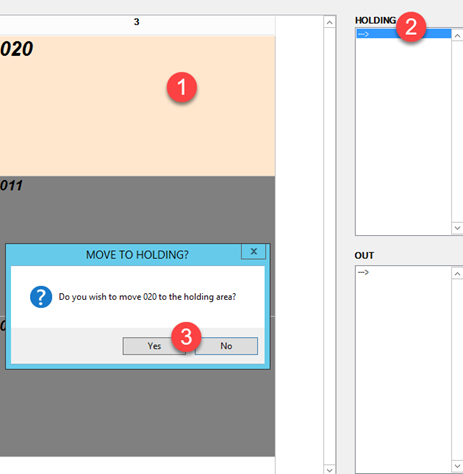
- Double click on the Storage Location.
- Double click on the arrow.
- Press Yes to confirm the Move to the location.
How to Move Storage from Holding to Location

- Select the empty Location.
- Double click the item from the holding location.
- Press Yes to confirm the movement.