MoveConnect

It is highly recommended that you do not use this window unless you have been instructed by a member of the Moveware Support staff, and are absolutely sure what you are doing.
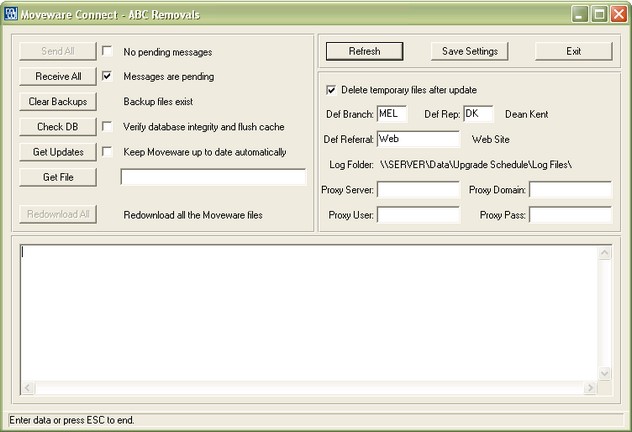
Moveware Connect is a feature of Moveware that allows you to send information, such as removals, Waybills and rate requests, to other companies over the web. This feature also supports OMNI Connect. The main Moveware Connect window is shown below. From here, you can change any settings relating to the operation of Moveware Connect.

Note: The features available from this window can only be performed from the server computer. If you are not on the server, any data being transferred may become fractured or even corrupt.
Fields
| Name | Type | Notes |
| Send All | Button | When active, the user can use this button to send any xml messages that are waiting to be delivered. |
| Send All | Check Box | When ticked, Moveware will automatically send any xml messages that are waiting to be delivered every few minutes. |
| Receive All | Button | When active, the user can use this button to import any xml messages that are waiting to be received. |
| Receive All | Check Box | When ticked, Moveware will automatically import any xml messages that are waiting to be received. |
| Clear Backups | Button | When active, the user can use this button to remove any backups of previously sent and received xml messages. |
| Check DB | Button | Runs a check on the database looking for any common problems, and also clears the database’s temporary cache data. |
| Check DB | Check Box | When ticked, automatically runs a check on the database once a day after 9pm. |
| Get Updates | Button | Downloads and installs any available updates relating to your Moveware version. |
| Get Updates | Check Box | When ticked, automatically downloads and installs any available updates relating to your Moveware version once a day after 9pm. |
| Get File | Button | Used to quickly download the latest version of the file specified in the text field. |
| Re-download all | Button | When active, all Moveware files will be downloaded to the server. |
| Refresh | Button | Checks to see whether there are any new messages to send or receive. If there are, the “Send All” and “Receive All” buttons will become available or unavailable. |
| Save Settings | Button | Saves all settings relating to automatic procedures such as sending and receiving messages, updating software and checking the database. If you have changed any settings such as tick boxes, your Moveware version or any default information to be used, it is imperative to save your settings before exiting or else they will have no effect. |
| Delete Temporary Backups | Check Box | Determines whether Moveware will delete the temporary downloaded files after running a program update. |
| Def Branch | Lookup Field | Selects the default branch that web quotes will be assigned to when automatically imported into the system. |
| Def Rep | Lookup Field | Selects the default sales rep that web quotes will be assigned to when automatically imported into the system. |
| Def Referral | Lookup Field | Select the default referral type that is applied to removals received via MWConnect. |
| Proxy Server | Field | If your Server uses a “Proxy Server” to access the Internet, then that “Proxy Server name” needs to be entered here. Please contact your Systems Administrator, or IT support group for details. |
| Proxy Domain | Field | As above |
| Proxy User | Field | As above |
| Proxy Pass | Field | As above |
Internet Information Service
The Moveware server needs to be setup such that it can host a website. For servers running a Microsoft Operating System, a program called Internet Information Service (IIS) is available to allow the server to host a website. IIS is a Microsoft product available as an additional program with Windows. The following details how to setup IIS for the effective operation of Waybill Transfer. Ensure the order is followed:
1. Check if IIS is installed. To do this go to Control Panel > Administrative Tools and look for Internet Information Services. If it cannot be found then IIS is not installed. To install IIS see you network administrator or see the Microsoft website for instructions.
2. Set the default website to c:\inetpub\wwwroot\ (this should be set to the default website when IIS is installed). This is not mandatory however it easy if all Moveware companies are running out of the same directory.
3. Once IIS is setup on the server, copy mwsoapserver.asp into the default website folder (c:\inetpub\wwwroot\ or the folder setup in step 2). This file is located in C:\Removals\Setup\mwsoapserver.asp
4. Run setup.exe located in C:\Removals\Setup\Update\Required\mwcdlls\setup.exe
5. Run mwcserviceinstall.bat located in C:\Removals\Setup\Update\Required\mwcservice\mwcserviceinstall.bat
6. Add a folder named xml to the default website (c:\inetpub\wwwroot\ or the folder setup in step 2)
7. Allow network users to change my files.
- Share this folder on the network
- Share name: xml
- Allow network users to change my files.
8. In IIS (Control Panel > Administrative Tools > Internet Information Service) expand the folders until the created xml folder can be seen under the Default Web Site. View the Properties of the xml folder (right-click then go to properties) and in the Default tab of the Properties window set the xml folder to have at least the following:
- Read
- Log Visits
- Index this Resource.
9. Start the website (Click the play button in IIS).
10. If the Moveware server is running a firewall then IIS needs to be given access the Internet. The firewall should allow exceptions to be given to programs to allow them to access the Internet. If the Moveware server is running the Windows firewall (Control Panel > Windows Firewall), IIS should be available to be selected from the list of programs in the Exceptions tab. If a non Windows firewall is running then access to the Internet needs to be given to the port IIS is setup on. This port can be found in the properties of the Default Web Site within IIS. See the manufactures manual to find out how to do this.
Moveware Code Information
Moveware Codes should contain the following code types and entries:
XML System
Within the codes table there needs to be a code type called XML Type. This lists the systems supported by Moveware that generate XML files for data transfer. Within this list there needs to be an XML System call Moveware Connect. It requires the following information: Code Value: MWConnect Description: Moveware Connect Short Cut: MWC Status: Active XML Type Within the codes table there needs to be a code type called XML Type. It lists the types of XML files produced by Moveware for data transfer. Within this list there needs to be an XML Type call Waybill Transfer. It requires the following information: Code Value: Waybill Description: Waybill Transfer XML System: Moveware Connect Short Cut: MWC Status: Active Comments: c:\inetpub\wwwroot\xml\ * the directory structure of the xml folder that was setup in the default website in step 6 of Internet Information Service section. XML Webid Within the codes table there needs to be a code type call XMLWebid. This code type is only visible by the Moveware Administrator user. This type lists all of the Web IDs that have been allocated to each of Moveware’s clients along with the IP address of the client’s website. These values will be administrated by Moveware. The values will already setup on upgraded systems. The detail of each client’s website is located in the comments field of the codes table. This website information needs to be accurate as it determines the success of the sending and receiving of XML files through Moveware Connect.
MoveConnect Window
To view all sent and received Moveware Connect Messages (including Waybills, WebQuotes, and other messages), the Moveware Connect Messages window needs to be setup as under the Operations menu item. The menu item needs to be setup with the following information (this should already be done as default by Moveware): Name: MWConnect Description: MWConnect Messages Parent: Operations Program: f-mwconnect.w Type: P Group: O Access: 9 Screen Resolution: A
MoveTransfer Window
To view all transferred Waybills (both sent and received) the Waybill Transfer window needs to be setup as under the Operations menu item. The menu item needs to be setup with the following information (this should already be done as default by Moveware): Name: WaybillTrans Description: Waybill Transfer Parent: Operations Program: f-waybilltransfer.w Type: PGroup: O Access: 9 Screen Resolution: A