Receipt a Customer Payment

A Customer Receipt is created following a payment from a Customer (often referred to as “Debtor” in these screens). This payment can be one of the following two payment types.
Payment Types
1) A deposit prior to an Invoice being posted (a proforma invoice, where the receipt will be done from Jobs – Invoicing tab ![]() ).
).
OR
2) A payment on a single or multiple posted Invoices from a single customer.
The Customer Receipt records the date, type, amount of payment, the Customer it was received from, and details of the bank account into which the payment was made. The Undeposited Funds account is used as a clearing account to do a bulk deposit into a bank from multiple customers as a single deposit.
How to Enter a Receipt
There are 6 steps to enter a receipt.
Step 1 – Select Account to Deposit To:

Select the account that is being deposited to. The drop-down menu will show accounts setup as Bank Accounts, or Undeposited Funds in the General Ledger Setup. Bank Accounts will create a journal entry going directly to the selected bank account, while the Undeposited Funds account will instead send the receipt to the Undeposited Funds clearing account which will require another step (Banking > Bank Deposits) to take it to the bank account (Usually for Cash Deposits, Cheques, or Credit Card Batch receipts).
Step 2 – Find Transactions by Debtor or Invoice

There are 2 ways to locate the invoice being paid. The Customer/Debtor can be selected by either typing in the name in the field, where Moveware will provide suggestions to select:

Or, by using the drop-down menu to bring up a customer look up where by default it will only show customers with balances, which can be toggled off if necessary (Toggle on Balance column):

Selecting of a debtor will list the currently outstanding transactions of that customer in the body of the receipting menu:

Alternatively, search can be done by Invoice Number as well, but searching by Invoice Number will only allow receipting against the searched invoice:

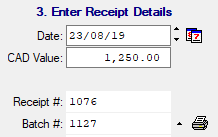
Step 3 – Enter Receipt Details
Depending on the bank account currency and invoice currency, there may be a foreign exchange rate to this step. This process is outlined in Receipt a Foreign Currency Payment.

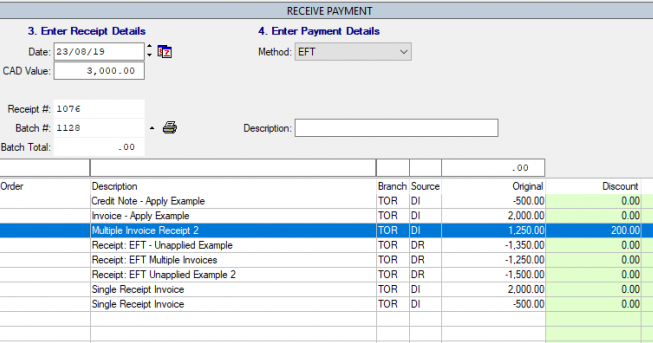
Date: Date of the Invoice, can alter the date by either selecting the calendar button, or using the arrows next to the date field. Keyboard shortcuts F9 = Current Date, F10 = 1 Day Up, F11 = 1 Day Down.
Currency Value: Amount being deposited into the bank, which may differ in the amount being paid by the customer in situations where there are discounts, or bank fees which will be recorded in step 5.
Receipt #: This is the number assigned to the receipt. This is an internal number that will continually increase with each subsequent receipt.
Batch #: An internal number utilized for searching or for creating a bank deposit in subsequent steps. The batch number will increase if the receipt screen is exited, or if manually progressed ![]() . The Batch will be a group of receipts.
. The Batch will be a group of receipts.
Print Current Batch of Receipts: Prints a report giving a summary of all the receipts in the batch ![]() .
.
Current Batch Total: Displays the total amount of the receipts in the current batch. There are system parameters available to verify the amount against a manually entered amount.
Step 4 – Enter Payment Details

Method: Depending on the method selected, other fields will become available (Credit Card info, cheque #, etc.). Mainly utilized for searching/filtering payments in reports or searching after creation.
Description: Description appears on the journal entry and in reports.
Step 5 – Apply Receipt
Applying the total balance to invoices to pay. This step includes Finance Charges, Card Surcharges, and Discounts. This stage will also include foreign exchange gain/loss on a foreign currency transaction (Refer to Receipt a Foreign Currency Payment).

Value: Amount of the deposit into the bank (Stage 3)
Applied: Total amount Applied to the invoices. All applied balances will appear in the Applied Column, which can be manually entered, or adding full/remaining amount of deposit by double clicking on the invoice (outside the green columns).
Finance: This is the bank charges and should be entered as a negative balance usually (Client pays 1,000.00, deposited amount of 975.00, bank charge of 25.00 = -25.00 Finance field). By default, this charge will go to the Finance Charge linked account, but the account can be overwritten by using the Modify G/L button ![]() to bring up a GL lookup pop-up menu.
to bring up a GL lookup pop-up menu.
Tax Code: Affects the Surcharge and Discount fields to determine what tax rate should be used on the balances. Example: Invoice for 1,100.00 has sales tax of 10% for a total tax of 100.00. A Discount of 110.00 is given to the client, and tax should be reduced by 10% as well. Setting the tax code will correctly record this in Moveware.
Surcharge: Similar to Finance, a surcharge is often added when customers pay by credit card. The entry should normally be entered as a positive balance to reflect an additional revenue. The Surcharge balance will go to the Card Surcharge linked account but can be overwritten using the Modify G/L button to bring up a GL lookup pop-up menu.
Discount: Totals the amounts entered in the Discount Column. Discount balances will go to the Discounts Given linked account but can be overwritten using the Modify G/L button to bring up a GL lookup pop-up menu.
Unapplied: Any balance not applied to an invoice will be recorded as an unapplied receipt on the customer’s file. A warning will be provided if there is an unapplied balance ensuring the balance should be left unapplied and given further details if desired. These balances can be applied to invoices using the Apply tab (Refer to Customer Management – Apply).
Step 6 – Post Receipt

Posting the receipt will create a receipt journal (DR) in the General Ledger. By default, the journal will be created as an Updated Journal (Status U), but the ability to post as an unposted journal (Status N) is available.