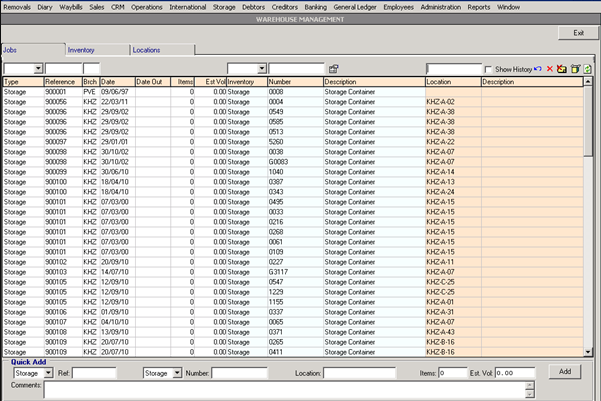
Warehouse Management
The warehouse module in Moveware is designed to facilitate the management of storage clients, storage containers and locations within your warehouse(s). The facility makes it easy to add clients who are coming into store (long or short term) into specified storage boxes/containers and place within specified locations. It is also possible to move the containers within the warehouse and mark when the consignment is removed. The module can also show historical records for locations and storage containers.
The Warehouse screen is found within the Storage menu.

The Warehouse Management screen contains three tabs – Jobs, Inventory and Locations. They all look quite similar and work in much the same way but allow different methods for searching and filtering. In other words, you can search by Job, search by Container Number (Inventory) or search by Location. Each screen also has a Quick Add function to add a new consignment, plus tools for locating items and removing from containers.
How to Add a Consignment Into Store
Each screen has a Quick Add function at the bottom of the screen. This is used for incoming storage jobs and enables the user to quickly place a client’s goods in storage modules/containers and specify where they are located in the warehouse.

- Specify what sort of consignment you are adding (Job/Removal, Storage or Waybill) by choosing from the dropdown on the left.

a. Job/Removal – Select if the consignment is Storage in Transit or a Storage file has not yet been created.
b. Storage – Select if the consignment has a Storage file created (usually long-term consignments)
c. Waybill – Select for manifested shipments such as an incoming import consignment.
- Ref: Double click to lookup either by Jobs, Storage or Waybill depending what was selected in step 1 above) and choose the applicable file.
- Select the inventory type that the consignment is in.

a. Storage – storage inventory items (wooden storage modules/crates/pallets)
b. Container – shipping containers - Number: Double click to choose from your pre-existing list storage or shipping containers. Select the appropriate container number(s) that are being used.
- Location: Double click to choose from the list of Storage Location. Select the Location where the item(s) have been placed.
- Date: Enter the date where the item was moved to the Location.
- Items: Enter the number of items.
- Est Vol: Enter the volume of the items.
- Comments: Enter any Comments
How to Edit Existing Records
The icons towards to top right of each page can be used to make changes, such as movements in the warehouse, items going out of store, etc.
Filter to find the required consignment, highlight it and then use the icons to make amendments as required:
- Locate item
 : This button will place the selected records into a location that will be selected by the user.
- Remove from location
 : This button will remove the Storage Pallets/Modules/Containers of the selected records from their Location.
- Remove selected item from container
 : This button will remove the items of the selected records from the Storage Containers/Modules.
- Empty container
 : This button will empty the container selected. It will remove all the Storage Accounts using the container, not just those that are highlighted on the screen.
- Refresh

How to Move a Storage Container to a New Location in the Warehouse
- Select the storage module number (number 1233 in this image)

- Select the locate item icon
 and choose the new location that it has been placed (KHZ-A-07 in this example)
- That’s it! – that consignment and storage container is now re-positioned

How to Remove Items from Storage Containers
- Select the records to remove. In this case I have selected two storage containers used by a client (hold Ctrl and click to select multiple)

- Select to remove from container

- The consignment is given a date out and will no longer view in general listings, but you can select ‘Show history’ and still find details of this consignment.

The above simply marks a consignment being removed from containers and does not close the storage account or finish charging. That is still done from Storage Management.
Using the option to ‘Show History’ simply shows any existing records from the selected – i.e. what container or location.
For instance, here I am viewing the details of container number 0010 now:

But with ‘Show History’ ticked, I can see previous “References” (Storage Accounts) and Locations used for that container.

How to Empty Storage Containers
The toggle for ‘Empty Inventory Only’ shows storage modules or containers which currently do not have consignments within them.

Event Logging
Changes and amendments made in the warehouse module are also recorded and show in the Event Log for the Removal/Job and Storage file.
In Storage > Storage Management, select a file and click the event log icon as highlighted in the screenshot below. Here it shows history of containers, movements and when removed.

If the consignment in store is part of a Removal/Job only (i.e. Storage in Transit or short-term storage), the Event Log in Jobs/Removals would also show such details.
Reporting
A report is available in Reports Menu under the Storage tab called ‘Warehouse’. The report allows filtering and grouping of data but essentially provides a listing with a style in much the same format as the on-screen view. This can replace the ‘Storage Locations’ and ‘Empty Storage locations’ reports.
