Outlook Inbox
Moveware can connect to your Outlook Inbox and add relevant emails to Jobs, Rate Requests, Waybills, Customers, Agents, or Suppliers. This allows you to view all emails that relate to a Job (for instance) from within the Diary tab of that Job.
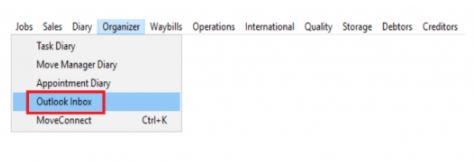
The Outlook Inbox Module is located in the Sales Menu, or the Organizer menu, depending on your database.

Set Up
To ensure emails can be synced, Outlook must be installed on the same computer that is running Moveware. The user’s email address must also be set in Employee Management > Details.

Reading Your Inbox
Open the Outlook Inbox module. On opening the Module, it automatically reads your Outlook inbox and imports your Inbox messages. Each Time you open the Outlook Inbox, it will only import new emails.
Note: The first time the outlook inbox is run it may take several minutes as it is reading the entire inbox. It may be worthwhile to delete/file unwanted emails.

Matching Email Records

The Outlook Inbox tool reads your inbox and creates a view of its messages. It scans the Subject line of the emails and looks for a match in the Jobs screen and other screens mentioned above. If a match is found, the Job number will display in the “Ref” column.
Note: If you intend to use this tool, it is a good idea to ensure that any outgoing messages you send relating to Jobs contain the Job number at the start of the Email Subject. This ensures replies will be matched to the correct Jobs.
If a match is found, it highlights the From and Subject fields pink and displays the Type, Reference, and Name of the matched Job and automatically selects the record (Placing a Y in the Sel column and highlighting the rest of the fields yellow). Refer to the yellow rows in the above screenshot.
By default, the Outlook Inbox will integrate your primary inbox. It can be set to integrate all inboxes (if you have multiple inboxes set up in Outlook) and your sent emails. To do so, select the relevant folder for the dropdown list

Editing Email Records
If an email was not matched, you can manually edit the Subject Line of the email and input the Job or other reference number. You can then manually run a match on the Database to find matching records using the lightning bolt icon circled below.

You can also manually Link an email by selecting the icon circled below:

This will generate a Jobs look-up and you can select the Job you wish to link the email to. Once you’ve linked the email to a Job, the record will automatically be selected (highlighting the line yellow).
It is also possible to link to the following by selecting the relevant ‘Link To’ field in the drop-down box

This will generate the relevant look up which can be selected and linked to the email.
De-selecting Email Records
If you do not wish to create a diary action from an already selected email, you can deselect the record by double clicking the record until it is no longer highlighted yellow and the Y in the Sel column has disappeared. Or you can deselect all records using the deselect icon circled below.

Viewing a Matched Job
You can view the Record/Job matched to the record by selecting the binoculars icon circled below.

Refreshing the List of Imported Emails
You can refresh the list by selecting the refresh icon. Note this may take a few minutes to refresh as it is again integrating you entire inbox

Creating Email Diary Actions
Now that the records have been selected, the next step is to create diary actions for each Email received. Press this icon:

This will then create “Email Received” Diary actions for the selected records.
Including Attachments
If you wish to download attachments with the email, you need to select the download attachments toggle.

This will download the attachment with the email when creating the diary action and place the attached file in the folder of the Job.
Viewing Emails
Emails can now be viewed within the Diary of the linked Job. The content of the email can be read in additional notes of the diary action in the bottom left of the screen.

Replying to Emails
You have the option of replying to received emails directly through the Diary of the Job or the Contact tab of the Agent/Customer/Supplier. To reply to a received email, highlight the email and select the reply icon icon ![]()