- Featured Product: Online Payments (Stripe)
- Meet Moveware
- Getting Started
- Jobs
- The Job Life Cycle and Statuses
- Jobs – Search
- Jobs – Details
- Jobs – DSP
- Jobs – Diary
- Jobs – Contact
- Jobs – Costing
- Jobs – Costing Interface
- The Costing Life Cycle
- Add a Cost Option
- Add Estimated Costs and Suppliers in Costing
- Add a Sell Price in Costing
- Add a Cost Line to a Cost Option
- Print a Quote for a Cost Option
- The Status Q Cost Option
- Modify the Cost Option Details
- The Option Total Line
- Add Actual Costs and Post a Purchase
- Accruals in Job Costing
- Multiple Currencies in Jobs Costing
- Enter Foreign Currency Costs and Sell Prices
- Add an Additional Cost Option
- Combine Cost Options
- Misc Job Types Costing
- Cancel a Cost Option
- Change a Cost Option Customer (Debtor)
- Change a Supplier (Creditor) of a Costing Line
- Set a Costing Line as No Charge
- Set a Cost Option as No Charge
- Create a Costing Credit Note
- Internal Resource Costs
- Jobs – Costing Fields
- Jobs – Invoicing
- Jobs – Invoicing Interface
- Create an Invoice in Jobs
- Modify Invoice Header Information
- Modify Invoice Charge Lines
- Invoice One Total Line
- Post an Invoice in Jobs
- Print an Invoice in Jobs
- Unlink an Invoice from a Cost Option
- Add a Credit Note
- Add an Additional Invoice
- Partial Invoicing
- Jobs – Invoicing Fields
- Jobs – Inventory
- Jobs – Resources
- Jobs – Import / Export
- Jobs – Waybill
- Jobs – Storage
- Jobs – Review
- Jobs – Claims
- Job Folder
- Baggage
- Fine Art
- Corporate (CRM)
- Sales
- Daily Diary (Operations Diary)
- Operations Diary Icons and Filters
- Operations Diary Notes
- Allocate Resources in the Operations Diary
- Close a Day from the Operations Diary
- Confirm Start Times
- Diary Actions in the Operations Diary
- Print the Operations Diary
- SMS Messages in the Operations Diary
- Enter Actual Times in the Operations Diary
- Operations Diary – Planner Tab
- Organizer
- Waybills
- Operations
- Full Screen Dispatch
- Container Movements
- Crates
- Destination Summary
- Fleet
- Inventory Management
- Labels
- Asset Management
- Object Management
- Resource Usage
- Start Times
- Timesheets
- Workload
- Diary Messages
- International
- Quality
- Storage
- Storage Management
- Storage Invoicing
- Storage Rate Revision
- Storage Locations
- Warehouse Management
- Customers
- Customer Management
- Customer Ageing
- Combined Invoicing
- Customer Approval Setup
- Invoicing
- Invoice Update
- Receipting
- Receipt Listing
- Receipts Import
- Van Line Clearing
- Suppliers
- Supplier Management
- Purchases
- Create a Manual Purchase Invoice
- Apply a Purchase Invoice to a Job
- Apply a Purchase Invoice to a Waybill
- Apply a Purchase Invoice to an Inventory
- Assign a Purchase Invoice for Approval
- Cancel a Purchase Invoice
- Email a Purchase Invoice
- Purchase Invoicing in Foreign Currency
- Modify a Purchase Invoice
- Place a Purchase Invoice on Hold
- Print a Purchase Invoice
- Reverse a Posted Purchase Invoice
- Search for a Purchase Invoice
- Purchase Event Log
- Purchase Approval
- Purchase Update
- Purchase Import / Export
- Accruals Management
- Payments
- Payment Batch
- Payment Listing
- Purchase Orders
- Contra Accounts
- Subcontractor Payments
- General Ledger
- Chart of Accounts
- General Ledger Setup
- General Ledger Inquiry
- General Ledger Journals
- General Ledger Accounting Close Date
- Budgets
- Sales Budgets
- Tax Return Module
- Banking
- Employees
- Employee Management
- Employee Payroll
- Employee Payroll Update
- Employee Payroll Admin
- Single Touch Payroll
- STP Phase 2 – Quick Start Guide
- STP Phase 2 – FAQ
- Moveware STP Configuration
- STP Workflow
- STP Reporting
- STP Corrections
- STP Data Export Fields and Requirements
- Administration
- Moveware Setup
- Bank Accounts
- Branch Management
- Calendar Management
- Codes Management
- Company Management
- Cost Centres
- Destinations
- Diary Actions
- Diary Messages
- Internal Phone Book
- Inventory Management
- Inventory Management – Containers
- Inventory Management – Crates
- Inventory Management – Furniture
- Inventory Management – Labour
- Inventory Management – Office Equipment
- Inventory Management – Other
- Inventory Management – Packing Materials
- Inventory Management – Storage
- Inventory Management – Vehicles
- Inventory Management – Vessels
- Job Products
- Job Types Management
- Locations
- News and Information
- Paragraph Management
- Ports Management
- Postcodes
- Rates Management
- Review Setup
- Sales Representatives
- Supplier Products
- Tax Codes
- Waybill Payment Messages
- Web Setup
- System Setup
- Codes
- Error Log
- Event Log
- Groups
- Menu Management
- MoveConnect
- MoveConnect Log Viewer
- Remote Printers
- Report Configuration
- Security Management
- System Settings
- System Start Numbers
- System Parameters
- User Management
- Mobi Setup
- Keeping Mobi Updated
- Set Up Employees to Use Mobi
- Configure Mobi Settings
- All Mobi Settings
- Language Setup
- Configure Pre-Set Paragraphs
- How to Customize Menus, Reports, and Reviews in Mobi
- Editing Inventory Item Button Ribbon
- Customize Mobi Inventory Buttons
- Defaulting Methods in Mobi
- Mobi Barcoding
- Configuring Mobi Costing Menu
- Send E-mails from Mobi
- How to Activate Mobi Automatic E-mail/SMS
- Set up a Feedback Form
- Exporting Data Out of Mobi
- Utilities
- Reports
- Generate Reports
- Set a Custom Report
- Print Reports
- Schedule Reports
- Configure Reports
- Reports – Favourites
- Reports – Sales
- Reports – Export
- Reports – Import
- Reports – Operations
- Reports – Storage
- Reports – CRM (Corporate)
- Reports – Customers
- Reports – Suppliers
- Reports – General Ledger
- Reports – Employees
- Reports – Analysis
- Reports – Other
- Reports – Schedule
- Moveware Applications
- MobiCrew
- Download and Log Into Mobi (MobiCrew)
- Sync Information in Mobi
- Mobi Interface and Menus
- Mobi Jobs
- Search Screen
- Summary Screen
- Notes Screen
- Addresses Screen
- Diary Screen
- Messages Screen
- Status Screen
- Inventory Screen
- Mobi Vehicle Receipting and Condition Reporting
- Materials Screen
- Manage Materials
- Costing Screen
- Client Signoff
- Reviews Screen
- Print Screen
- Check Off Screen
- Timesheet
- Download Screen
- Vehicle Documents
- Mobi Warehouse
- Mobi Fine Art
- Mobi Submit Feedback Menu
- MobiSurvey
- Online Payments
- MoveSurvey
- MoveSurvey Setup
- Install MoveSurvey
- MoveSurvey Wizard
- MoveSurvey – Import Onto Another Device
- Moveware Codes for MoveSurvey
- Set up MoveSurvey Users
- Set up Job Products for MoveSurvey
- Set up Inventory for MoveSurvey
- Moveware reports in MoveSurvey
- Run MoveSurvey
- Enabling the Camera Permissions in MoveSurvey
- Uninstall MoveSurvey
- Using MoveSurvey
- MoveSurvey Main Menu
- Synchronise Data in MoveSurvey
- MoveSurvey – Search
- MoveSurvey – Details
- MoveSurvey – Notes
- MoveSurvey – Diary
- MoveSurvey – Inventory
- MoveSurvey – Review
- MoveSurvey – Resources
- MoveSurvey – Account
- MoveSurvey – Client Summary
- MoveSurvey – Reports
- MoveSurvey – Tools
- MoveSurvey Photos & Attachments
- MoveCrew
- MoveCrew Setup
- Using MoveCrew
- MoveSMS
- MoveTransfer
- Portal
- Web Portal – Moveware Admin Guide
- Web Portal – Move Manager Guide
- Web Portal – Client Guide
- Web Portal – Online Quote
- Web Portal – Partner Guide
- Third Party Interfaces
- 1-Stop
- A3
- ABF
- Adobe Sign
- ADP Payroll
- Allied Van Lines Canada
- Altair
- ANZ
- Ariba
- Australian ABA File
- Bambora
- Bank of NZ
- Bekins Van Lines
- Canadian Banking Files
- Cargowise
- Compare Quotes
- Credit Cards
- CustomsController
- Daycos
- Dimensions (Access)
- Dynamics Business Central
- Dynamics Navision
- EasyDPS
- eMyLeads
- Enterprise
- Exactus
- Exact
- Ezidebit
- FMS
- Fuel Card Interfaces
- Great Plains
- Happy to Serve
- Harmony
- Hockingstuart
- IBS
- ISF Integration
- LogiX
- Make Tax Digital
- Manpack3
- Maximizer
- Moving24
- MSP
- MVF / MoveHub
- MyDHL+
- NAB Transact
- NEDVAN
- NES (National Export System)
- New Zealand Banking File
- New Zealand Defence Force
- New Zealand Ministry of Education
- New Zealand Police
- OFAC
- Orphee (Groupage)
- Parsifal PRISM
- Pasha
- Podium
- Quickbooks
- RHA
- Royal Mail PAF
- Royal Wolf
- Sage
- SAP
- SAP Ariba
- SCF
- SEPA File
- South African Banking Files
- SuperStream
- Techmate
- Trackfreight
- TriGlobal
- Twilio
- UK BACS File
- U.S. Bank – Multi Payment Export
- U.S. NACHA File
- Visma Global
- Weichert
- Westpac NZ
- Westpac (PayWay)
- Worldpay
- World Office
- Wheatons Van Lines
- Xero
- Moveware Hosting Platform
- Infrastructure Setup
- Moveware Infrastructure Setup
- Product Requirements
- Recommended Settings for Windows Desktop Resolution
- General Settings
- Install Moveware Client on Terminal Server or Workstation
- Install Crystal Reports Runtime Files (Manually)
- Install Moveware PDF (Manually)
- Moveware Database Setup
- Database Client Tools
- Disaster Recovery
- Moveware System Security
- Moveware System Backup
- Moveware System Restore
- Ransomware
- Set up a Microsoft Scheduled Task
- Set up a Moveware Database and Backup Procedure on a Client’s Server
- Windows Update Settings
- Windows Virus & Ransomware Protection
- Glossary
- Help and Support
When setting up Moveware for Purchase Approval, there are a few key decisions to be made.
1) How many Approvers are required for each Purchase Invoice?
Some
companies choose to have one Approver. This can be the person who arranged for
the Supplier to do the work for that Job, as they are in the best position to
verify the accuracy of the invoice. Or, it can be a manager who reviews all
Purchase Invoices before they are given to accounting to post to the G/L.
If you want one Approver for each Purchase Invoice, set the System Parameter
“Use Purchase Approval” to have a value of Y.
Other
companies have two people involved on working with Suppliers on a Job, and
would like two Approvers for every Purchase Invoice. Moveware allows for
Multiple Approvers.
If you want two Approvers, and it doesn’t matter which order they approve the
invoices in, set the System Parameter “Use Purchase Approval” to have
a value of M.
The third option is to have one person do the initial approval, and then their
manager to approve it afterward (in that order). Moveware can accommodate this
by assigning a “Final Approver”. If you want an Approver, and then a
Final Approver who review Purchase Invoices, set the System Parameter “Use
Purchase Approval” to have a value of F.
There are a few fields in Codes Management that need to be activated as well. In Codes Management, filter by “Type” (top left dropdown menu) of Employee Details. Activate the “Purchase Approver” field and the “Purchase Approval Limit” field. If using a Final Approver, activate “Assigned Final Approver” and “Purchase Final Approver”.
2) Who are your Purchase Approvers and what are their limits?
Now that you’ve activated the Purchase Approval fields in Employee Details, you can go to Employee Management > User Details to set up the Approvers.
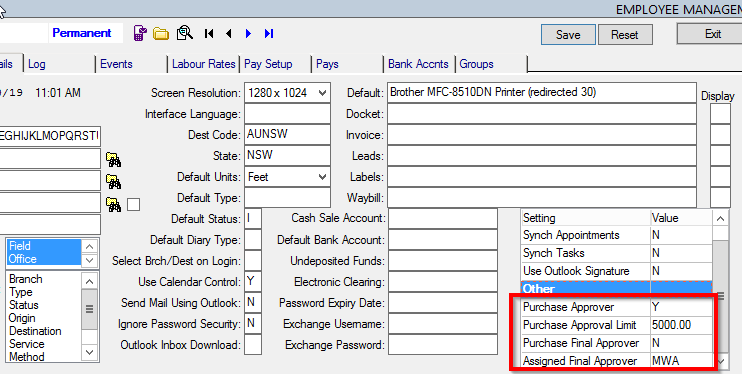
Each Employee who is a Purchase Approver should have a Y set in the Purchase Approval field. The value the user is authorized to approve is defined in the Purchase Approval Limit field.
If using the Final Approver option, all Final Approvers should be set as “Purchase Final Approver” = Y. Each initial Approver should then have the initials of the Final Approver set in the “Assigned Final Approver Field”. In the case of the above screenshot, the Employee is an Approver with a Limit of 5000.00. He is not a Final Approver. His Final Approver is user MWA. After he approves purchase invoices, MWA makes the final approval.
3) Add the Purchase Invoice Status of A
The final step in setting up Purchase Approval is to set the System Parameter “Use Purchase Approval Status A” to have a Value of Y. This creates a new status used for Purchases that have been approved. Without Purchase Approval, the Statuses are N (Not Posted) and U (Posted to the G/L). With this Parameter activated, Unapproved Purchase Invoices will have a Status of N, Approved Purchases will have a Status of A, and posted Purchases a Status of U.
With this Parameter Activated, the Purchase Update will now display purchases in Status A, to be reviewed by Accounting and posted to the G/L.