Moveware Version 8.4 Release Highlights
Dear Clients,
It is totally understandable that finding the necessary time to read through the entire content of our Release Notes can be challenging and time consuming. This Highlights package has therefore been assembled in order to bring the most remarkable features from our latest update to your attention. We genuinely hope that this summary will empower you in maximizing the potential of Moveware, as we always strive towards ensuring superior user experience on our platform. Should any of the notes be of particular interest to you, please reach out to your local support team. It will be our pleasure to assist you in setting up.
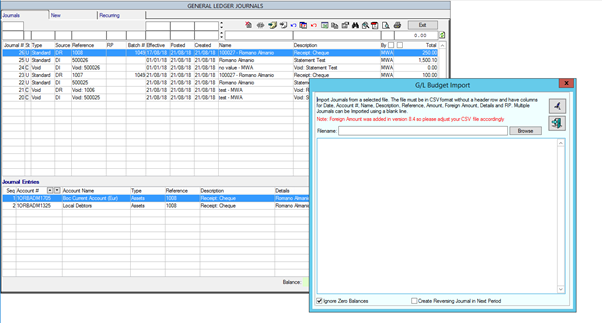
Highlight #1: 307666 – Added ability to Import Foreign Currency Journals
We have added an extra column to the General Ledger CSV import to allow foreign currency journals to be imported. If you leave the extra column blank, it will assume it is a local currency journal only.
The change has occurred in the General Ledger > Journals screen. We have modified the import CSV dialogue box and the accompanying import procedure to cater for foreign currency journals.
Highlight #2: 320658 – New System Parameter – to Enable Quick Paste Resource on Ops Diary.
Add new system parameter to Enable Quick Paste Resource on Ops Diary.
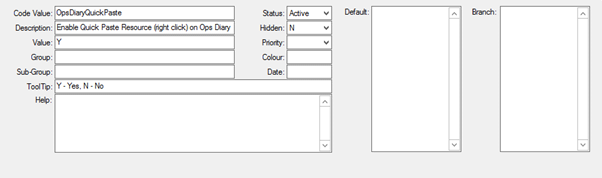
Previously, when a user copies allocated resources via the Copy button, they need to click on diary action and then click Paste button and click OK to the prompt message to be able to paste resources. But with this new sysparam ‘OpsDiaryQuickPaste’ enabled, user can paste the resources by right click on selected diary action and it will bypass the prompt message (except if there are error messages).

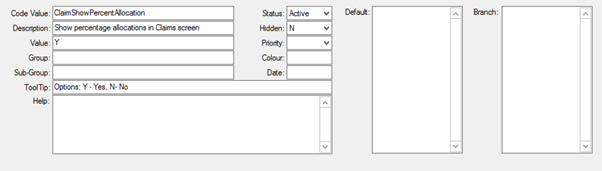
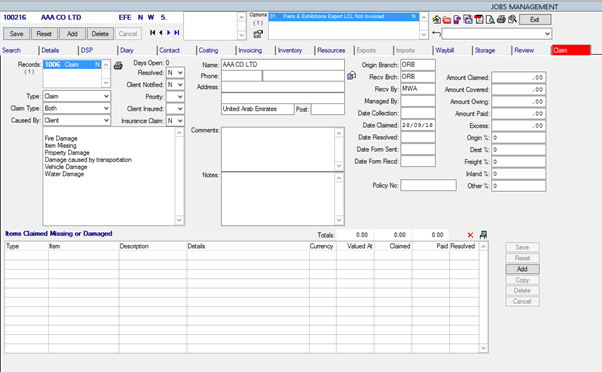
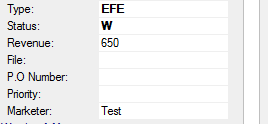
Highlight #3: 319290-078AA – New System Parameter – to Show Percentage Allocations on the Claims screen.
When the system parameter is enabled, the system will show Pack %, Origin %, Freight %, Destination % and Other % fields on the Removals Claim screen and Claim Details screen.
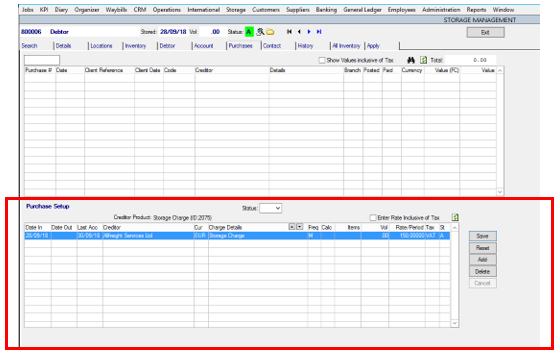
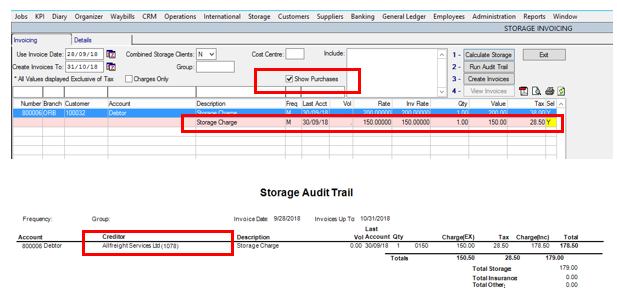
Highlight #4: 319290-078V – New System Parameter – Create Purchase from Storage.
A new system parameter has been added for a storage purchasing feature and the Moveware Standard Audit Trail report will show storage purchasing information after invoice lists.
When the systemparam is enabled, a Purchase setup section will be enabled in the purchase tab in the storage account.
When you added purchasing info to storage account those purchasing lines will show on the storage invoicing screen in the red line.
In this case the report will also show those purchasing information in the report (after invoice lists).
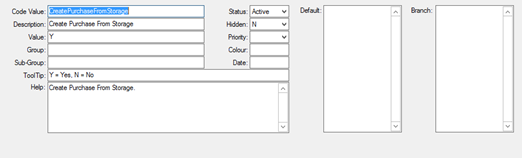
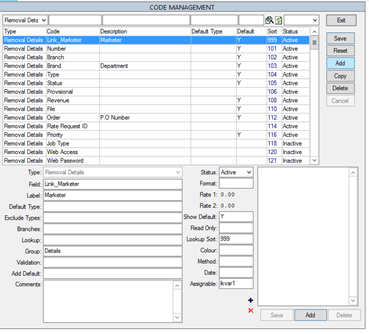
Highlight #5: 319290-078S – Ability to create spare removal fields on the fly and to assign diary actions to any removal field.
For Moveware systems using the ‘New Details Browser’, we can dynamically add fields to the right hand browser of removals management. This allows the user to add spare fields as required.
For Moveware systems using the ‘New Diary Assigned To Functionality’, users can create roles based on any Removal field on the right hand browser.
To create a dynamic spare field, simply create a ‘Removal Details’ code with the Field prefixed with ‘Link_’. E.g. if you’re creating a field for a Marketer, simply create a code of type ‘Removal Details’ and field equal to ‘Link_Marketer’. You may then set the description of the code to whatever you would like to be displayed as the label of the field.
To utilise the Diary Assign to, simply set the ‘Assignable’ field of the corresponding ‘Removal Details’ code to the Moveware database field (you may need to consult Moveware support for the field name). If you’re using a ‘Link_’ field, then simply set this field to ‘lkvar1’.
Highlight #6: 329407- Added ability to customise auto-creation of diary actions based on removal customer type.
Certain diary actions can now be auto-created based on the customer type set on the job. This can be customised using the ‘Filters’ in diary action setup using the format of ‘CustomerType:Type1;Type2’.
If a diary action should be created regardless of the customer type, then simply do not add this filter to the action.
In Diary Setup, go to a diary that is being auto created (i.e. Auto Create = ‘Y’) that needs to be created based on the customer type of the job. In its Filters, simply add ‘CustomerType:Type1;Type2;Type3’ where Type1, Type2 & Type3 are valid customer types that the diary action should be created for. Each type needs to be separated by a semi-colon. If there are existing filters already setup against the diary action, then simply separate that with a comma.
Create a job that satisfies the auto-create requirements and notice that the diary action will be added if the customer type matches one of those set in the filter. If the customer type does not match any set in the filter, then the diary action will not be created.
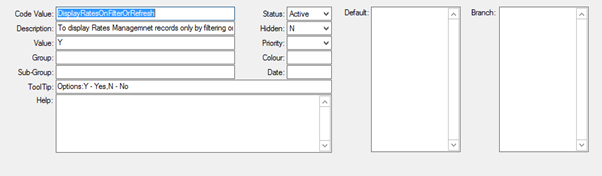
Highlight #7: 327117 – New System Parameter – ‘Display Rates on Filter or Refresh’.
New system parameter “Display Rates On Filter Or Refresh” which when enabled will not load any Rates records in all 4 tabs of Rates screen and loads the records only when clicked on Refresh button or any of the filter field is clicked enter key. Previously, when Rates screen is opened, user had to wait for the screen to return the records (too slow) before they can interact with it.
The user can enable the below system parameter, open the Rates screen, click on any of the tabs will not return any records.
Click on Refresh button or click any filter field or double click on Filters to select from lookup and click Enter key which will return the records.
This is done due to the records not loading so that the user isn’t waiting for the screen to return the records before they can interact with it.
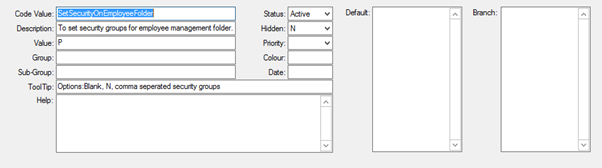
Highlight #8: 318383 – New System Parameter – ‘Set Security on Employee Folder’.
Added new system parameter to display employee management folder based on security groups. Previously, employee management folder is visible to all users.
The user can set the below system parameter with comma separated security groups and the user logged in has the above security group will have the visibility of employee folder else the folder is hidden. If the below system parameter is set to blank or ‘N’ then the folder is visible.
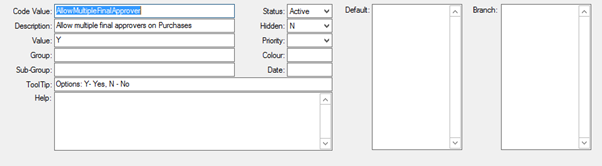
Highlight #9: 316881- New System Parameter – Allow multiple final approvers on Purchase Invoices.
A new system parameter has been added to extend the final approver functionality and allow multiple final approvers. In a previous version of Moveware the ability to have a final approver on a purchase was implemented. This meant that a purchase was not approved until the allocated final approver approved the purchase. The original design only allowed for one final approver. This parameter now allows for multiple final approvers.
Several Moveware clients have purchases that cover multiple removals across multiple branches. In these instances, the move managers of these removals need to first approve the charges and send these onto their allocated final approver to finish off the approval process. Due to there being multiple branches there are in many cases multiple final approvers required to approve elements of the purchase. Therefore, multiple final approvers need to be allocated to the purchase.
When this parameter set to Y the Final Approver field on the purchase is expanded. Users are able to append to the final approver list. Final approvers are not able to begin approving the purchase until all of the first level approvers have completed the first level approval process. Once each final approver approves the purchase they will be removed from the list of final approvers until the last final approver is left. Once the last final approver approves the purchase, the purchase then become approves. The last final approver will remain on the purchase while a history of all the final approvers is kept on the purchase.
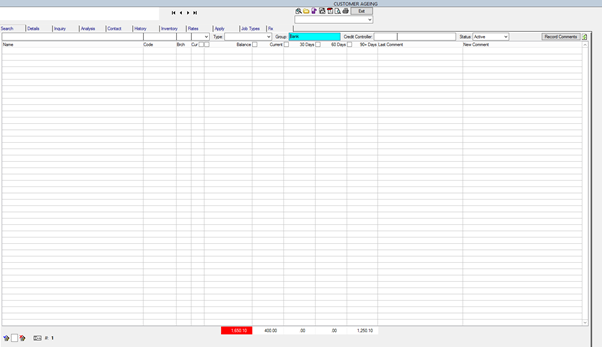
Highlight #10: 328208 – Resizing Debtor Ageing Screen for all resolution to use same sizing as the Debtor Management screen.
Previously, the Debtor Ageing screen was displaying as screen resolution 1024 x 768, now the screen can display as full screen based on the screen resolution.
Debtor Ageing screen (Debtors > Debtor Ageing)
User can set the screen resolution via Change User Details screen (Window > Change User Defaults) and Debtor Ageing will resize the screen based on the user’s screen resolution.
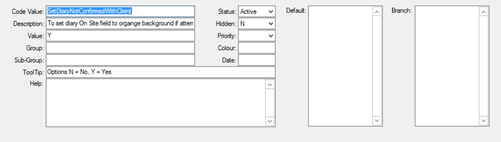
Highlight #11: 329221 – New System Parameter – ‘Set Diary Not Confirmed with Client’.
To set the diary On Site column with colour if attempted to contact but not confirmed. Previously, user could only set with 2 options Confirm/Unconfirmed.
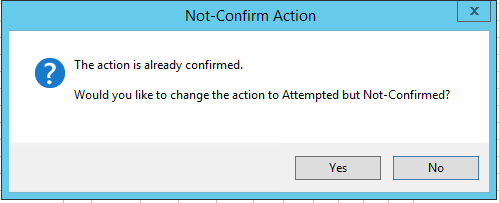
The user can enable the below system parameter, select a diary record and click on ‘Time or Action Confirmed with Client’ button which will display a Yes/No window to confirm. Click Yes.
The user can again select the same record, click the above button again which displays Yes/No window to new option if attempted but not confirmed option. Click Yes.
The user can again select the same record, click the above button again which displays Yes/No window to Unconfirmed. Click Yes.
Highlight #12: 304490 – Enhancement to Debtor Job Type to work in Rate Request.
Enhancement to Debtor Job Type to work in Rate Request, previously Job Type setup within a Debtor Account would only work in Removals Management, this functionality has been expanded to work in Rate Requests
Job Type in Debtor becomes active when using Tariff System Parameter.
Highlight #13: 327651- Supplier Rates Table and Destination Summary Bidding.
We have created several System Parameters to able the recording, management and bid offering for Supplier/Agent Rates.
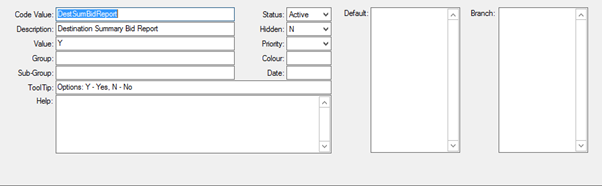
System parameter ‘Destination Summary Bid Report’
Enable the ability to select multiple jobs in destination summary and then click on the printer button to send an email to multiple Suppliers in order to receive a bid/offer for multiple jobs at one time.
Note: If no jobs are selected then the button will function as it does currently which is to print the Destination Summary Report).
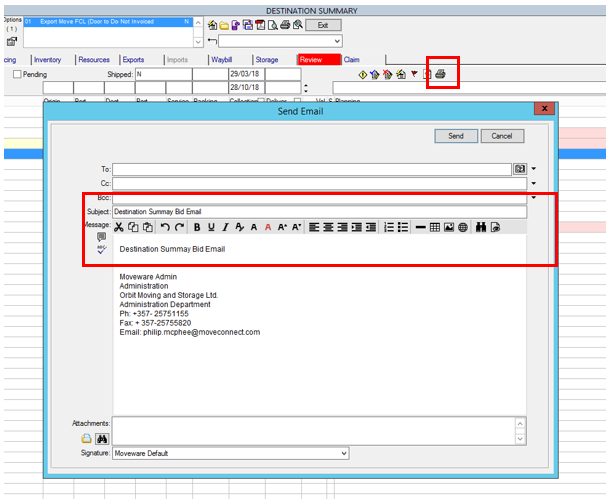
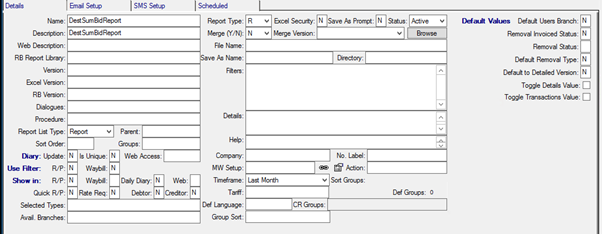
Note: A Report of the same name ‘DestSumBidReport’ must exist in Report Configuration and can be customised to meet individual clients needs.
System parameter ‘Enable Removal Rates’
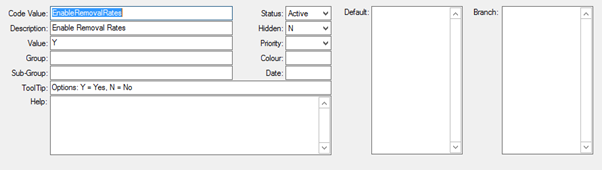
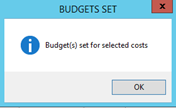
Enables budget and rates lookup buttons in the Costing Screen. This allows user to convert creditor product rates into a budgets for the Operations/Planning Department.

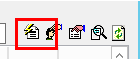
$ is to set a Budget and the Binoculars are to view the Rate on the Job.
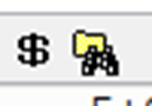
Note: To activate the Budgeting Icon to “Green” user must “Select” the Costing Line and multiple lines can be converted to Budgets in one go.
If the budgeting button is selected twice on a costing line this will find the previous rate created using the budget button and replace that rate if it exists.


A (lightning) button in the Rates Lookup Screen to assign the selected rates to the corresponding cost lines on the job. This button will only show if ‘EnableRemovalRates’ system parameter is turned on.
Users can select one or more rates in the rates lookup screen and then click the lightning button which will then assign the selected rates and their values as well as supplier/creditors to the corresponding cost lines on the job. It will match to find the cost lines in the following order:
i) If the rate was created from a cost line using the budget button, it will first assign to this cost line.
ii) If the cost line is not found or if the rate was added directly in the rates lookup screen, then it will try to find the first cost line on a non-cancelled, non-lost & non-credit or Q cost option on the same job with matching creditor assigned.
iii) If the cost line is not found using the above criteria then it will try to find the first cost line on a non-cancelled, non-lost & non-credit or Q cost option on the same job
iv) If the cost line is not found then the rate will not be used and the user will be notified with a prompt at the end.
v) If the cost line is found but the rate has a value of 0, it also will not be used and the user will be notified with a prompt at the end.