Moveware Version 8.7 Release Highlights
Highlight #1: 327952-015B Exchange Rate Validity
We have created a new System Parameter “To use Invoice Date to determine exchange from for Purchase”. It can be customized to work on a branch or cost centre level and caters to check for an exact date match validation.
If this System Parameter is enabled, the system will look at the Invoice Date when creating a new purchase. It will check for the exact exchange rate match (the exchange rate that was valid on the date of the purchase invoice itself), instead of looking at the current valid exchange rate. A purchase cannot be created if there is no exact exchange rate.


System Parameter settings:
Code: PurchaseExchangeInvoiceDate Description: To use Invoice Date to determine exchange from for Purchases Options: Y – Yes, N – No,Branch[Cost Center:Value;Cost Center:Value],Branch[Cost Center:Value] Y = Will use the purchase invoice date exchange rate for all branches N = Will use the currency exchange rate of Today for all branches.
Highlight #2: 327952-078C Interbranch Job Handling
Moveware companies may have branches in different places worldwide who operate as agents for each other and contribute to the same Job/Removal. These branches will need to perform work as required and it is important that information regarding the Job/Removal is shared among the branches assigned.
Previously, Moveware did not allow data to be synced between Jobs/Removals. Users would have to manually create a sequenced Job/Removal from the original one. From that point on, both Jobs/Removals are completely independent of each other and the data is managed by each branch.
Moveware has now developed a new functionality, which allows sequenced Jobs/Removals to be automatically created for the Origin Agent and/or Destination Agent’s branch if assigned. These Jobs/Removals are linked and the system can be setup to allow specific data to be synced between the linked Jobs/Removals.
The steps in setting this up involve a System Parameter and adding new codes in Codes Management. We advise that you contact your Account Manager for the correct setup.
Below is the new System Parameter to control whether Jobs/Removals can be linked and have their data synced. Please note that this is the global control for this feature.
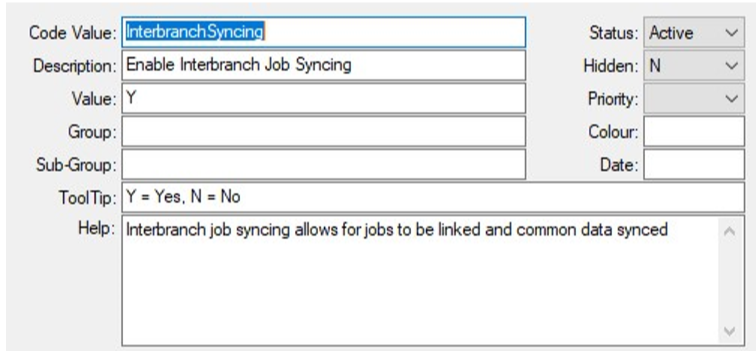
Apart from the System Parameter, Code type of ‘Syncing’ is used to handle the rule for when a Job/Removal may have linked records created. Multiple codes of the type ‘Syncing’ may be created with different rules and setup applied. This allows for syncing to take place in different scenarios based on the branch, type, and status of the original Job/Removal.
To ensure that the new codes to be created in Codes Management best suit your company’s needs, please consult your Account Manager for further details.
Highlight #3: 327952-078G Invoice Numbering
Previously, Moveware’s invoice numbering was limited to a simple system, branch or company sequence. However, branches may have different requirements for setting the invoice number. Some companies may have different sequences for their branches or company. This also allows for variations in local legal regulations in each country they operate.
Moveware have developed a functionality which allows flexibility in the ways in which invoice numbers are created across branches. To utilize such functionality involves several System Parameters and some extra steps to complete the setup in Codes Management and Branch Management. Your Account Manager can provide more details and assist you in setting this up.
As a part of this new functionality, we have extended two System Parameters which are “Implement Branch Invoice Numbering” and “Use Branch Purchase numbering” by adding a new option of ‘S’. The new option ‘S’ means the invoice number will be generated from setup of the Sequence Codes in Code Management.
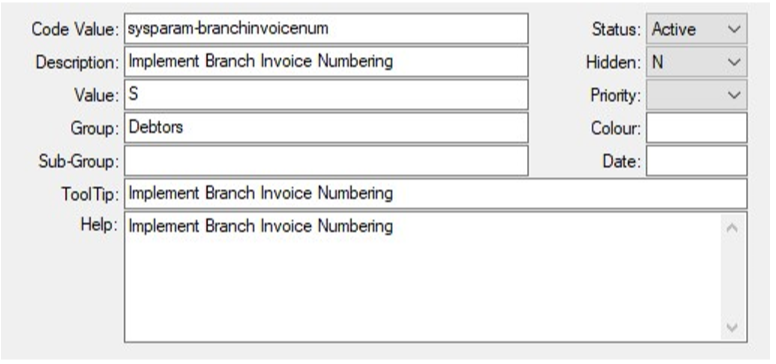
Also, two new System Parameters “Size of the Invoice Number field” and “Size of the Purchase Number field” have been added to set the size of the Invoice number and Purchase Invoice Number fields throughout Moveware. This will allow the fields to be expanded if the Invoice numbers are set to be long.
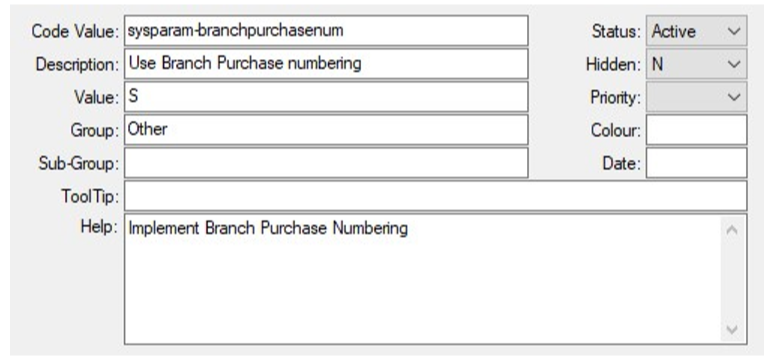
Further steps are required to complete the setup in Codes Management and Branch Management. To ensure the correct setup and avoid causing damage to your system, please consult your Account Manager for more information.
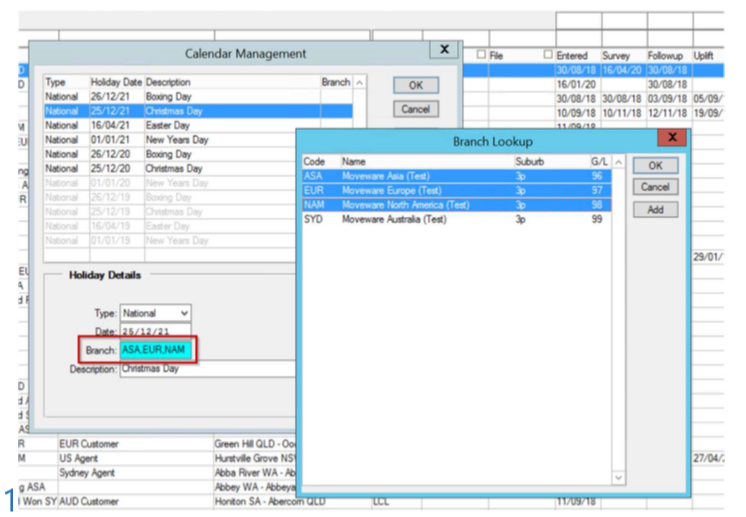
Highlight #4: 366064 Calendar Management for Multi Branches (Enhancement)
We have enhanced the lookup dialog to select multiple branches in Administration > Calendar Management > Branch field. This is especially useful for big companies with various branches in different countries. With this new ability, you can for example assign “Christmas Day” to multiple branches in one go. Previously it was only possible to have one single branch code in the ‘Branch’ field and each record had to be created separately for all branches where the holiday was applicable.
Highlight #5: 323266 Quality Feedback Analysis Report
We have created a new report called “Quality Feedback Analysis” to show the details of the review questions and answers. The report calculates the number of answered questions against Jobs/Removals. It can distinguish between questions where the client chose the option N/A (No Answer) and questions which were not answered at all (no option selected). It shows the list of review questions, scores and percentage based on the filter ‘Review Type’ (e.g Client). The report can be filtered to see the reviews for one particular client only as well.
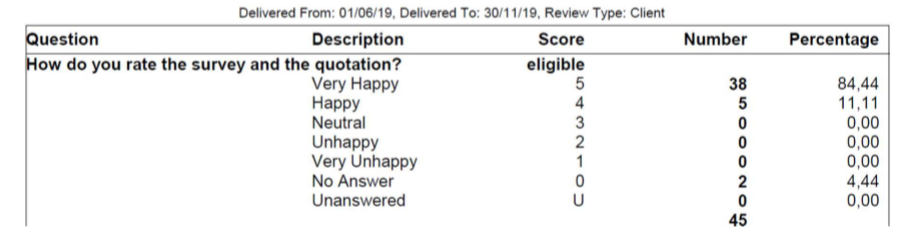
For the report to print properly, you need to make sure that you have a Rating option for N/A (No Answer), which can be set up under Administration > Setup > Codes Management > Type: Ratings
To access the new report, navigate to: Reports > Analysis > Jobs > Quality Feedback Analysis
Highlight #6: 327952-078N New System Parameter to Default Sort Order for the Debtors Invoicing Screen
We have enhanced the sorting of Invoices on the Debtors Invoicing screen with a new System Parameter called “Default sort order for Debtor Invoicing screen”. This System Parameter enables you to choose from a variety of values to sort by default
Details of the System Parameter values:
1 – Sort by Invoice numbers (in ascending order)
1D – Sort by Invoice numbers (in descending order)
2 – Sort by R/Plan numbers (in ascending order)
2D – Sort by R/Plan numbers (in descending order) 3 – Sort by Date (in ascending order)
3D – Sort by Date (in descending order)
4 – Sort by Order (in ascending order)
4D – Sort by Order (in descending order)
5 – Sort by File (in ascending order)
5D – Sort by File (in descending order)
6 – Sort by Currency (in ascending order)
6D – Sort by Currency (in descending order)
7 – Sort by Debtor Code (in ascending order)
7D – Sort by Debtor Code (in descending order)
8 – Sort by Bill To (in ascending order)
8D – Sort by Bill To (in descending order)
9 – Sort by Name (in ascending order)
9D – Sort by Name (in descending order)
10 – Sort by Branch (in ascending order)
10D – Sort by Branch (in descending order)
11 – Sort by Type (in ascending order)
11D – Sort by Type (in descending order)
12 – Sort by Src (in ascending order)
12D – Sort by Src (in descending order)
13 – Sort by Cost Ctr (in ascending order)
13D – Sort by Cost Ctr (in descending order)
14 – Sort by St (in ascending order)
14D – Sort by St (in descending order)
15 – Sort by Pd (in ascending order)
15D – Sort by Pd (in descending order)
e.g. Value 2D – sort by R/Plan descending
System Parameter Settings:
Code: InvoicingDefaultSort
Desc: Default sort order for Debtor Invoicing screen
Options: [Column index] + [” for ascending, ‘D’ for descending]
Default: 1D – Sort by Invoice # descending
Highlight #7-8: 348151 and 357246 Updates to the Data Transfer Screen to Allow for Automatic Report of Payroll and Rates
We have added the ability to the “Data Transfer Setup” screen to automate the import files of various types.
Clients can create a network location which is accessible by the server and provide this information to a Moveware staff member. They will then update the Data Transfer Setup screen with the relevant data. The system will constantly check for the files stored in certain directories and automatically import data into Moveware. Currently this import is available for both Payroll and Creditor Product Rates and Moveware is able to import multiple files at a time.
Highlight #9: 357620 New System Parameter to Prevent Miscellaneous Job Types from Being Displayed When Running Job Type Creator
We have added a new System Parameter “Miscellaneous Job Types filter by Type” to prevent Miscellaneous Jobs/Removals from being displayed when running the Job Type Creator. This also requires an additional setup in Job Types. Please see below for how to utilize this new functionality.
Enable the System Parameter “Miscellaneous Job Types filter by Type” (Administration > System Setup > System Parameters).
In Job Types Setup (Administration > Company Setup > Job Types), two extra fields – Default Types and Exclude Types – will appear if users select Jobs/Removals in the Miscellaneous category.
The usage of the Default Types field and the Exclude Types field are as follows:
Default Types – Enter the Cost Centres that each Miscellaneous Job/Removal is applicable to into this field. When users run the Job Type Creator on a Job/Removal which belongs to these Cost Centres, the type will be available for users to select.
In this instance, the Access Fee or Z003 Job Type is defaulted to the COM Cost Centre. Therefore, the Z003 type will appear when running the Job Type Creator on a COM Job/Removal.
On the other hand, adding Cost Centres to the Exclude Types field will prevent the Job Type from being displayed when running the Job Type Creator on Jobs/Removals that belong to those Cost Centres. In this example, Access Fee or Z003 is excluded from the EX Cost Centres.
If both Default Types and Exclude Types are blank, the Job Type will be displayed for all Jobs/Removals.
System Parameter settings:
Code: MiscJobTypeUseTypeFilter
Description: Miscellaneous Job Types filter by Type
Options: Y – Yes, N – No (Default = N)
Highlight #10: 361023 Ability to Drag and Drop Files Directly into the Attachment Folder on the Purchases/Invoicing Screen
We have added the ability to drag and drop files directly into the attachment folder on the Purchases/Invoicing screen.
If you are not able to see the icon of the file you drag into the folder, make sure that the file type “All Files (,)” is selected. The files will also be copied into the related directory of the Purchase/Invoice.
Previously, the folder icon on the Purchase and Invoice screen did not support Drag & Drop of files.
Highlight #11: 365925 New Filter Columns on Report Configuration Screen
We have added four new columns to the Report Configuration screen to allow the ability to filter the reports by: 1) Branch 2) Type 3) Linked Diary Action and 4) Language.
Please note that the screen will appear without the Language column if the System Parameter “Enable Multi-language Support” is not enabled. Below is the new Report Configuration screen without the Language column.
Activate the System Parameter “Enable Multi-language Support”.
After the System Parameter is enabled, the Report Configuration screen (Administration > System Setup > Report Configuration) will display the Language column.
The usage of each new columns is as follows:
- Branch – used to filter branches and show only a certain branch which corresponds to those set in the ‘Avail Branches’ field under the Details tab in Report Configuration.
- Type – used to filter move types and show only a certain type which corresponds to those set in the ‘Selected Types’ field under the Details tab in Report Configuration.
- Linked Diary Action – used to filter linked diary actions and show only a certain diary action which corresponds to those set in the ‘Action’ field under the Details tab in Report Configuration.
- Language – used to filter languages and show only a certain language which corresponds to those set in the ‘Def Language’ field under the Details tab in Report Configuration.
Highlight#12: 367076 New System Parameter to Disable Ability to Send Email and Exporting on Posting Bank Deposit Record
We have added a new System Parameter called “On Posting Bank Deposit record, to disable ability to Send Email and Exporting” which allows users to disable the Bank Export prompt and Email Remittance prompt after posting on the Bank Deposits screen.
If this System Parameter is disabled (Value = N), Moveware will trigger pop-up windows for ‘Bank Export’ and ‘Email Remittance Address’ when a user posts bank deposit record.
The ‘Email Remittance Address’ pop-up will be disabled if the System Parameter is set to ‘E’.
The Bank Export pop-up will be disabled if the System Parameter is set to ‘B’.
Both ‘Email Remittance Address’ and ‘Bank Export’ pop-ups will be disabled if the System Parameter is set to ‘Y’.
System Parameter Settings:
Code: BankDepositDisableOnPosting
Description: On Posting Bank Deposit record, to disable ability to Send Email and Exporting
Options: Y = Both prompts disabled (default to N) B = Bank Export prompt disabled E = Email Remittance Address prompt disabled N = Prompts are not disabled
Highlight #13: 371373 New Buttons Regarding Release Notes
We have added two new buttons which will allow users to navigate to our Wiki page from Moveware where they will find details of our Release Schedule as well as all Release Notes for both the current and previous Moveware versions.
To find the buttons, click on the ‘Window’ tab then select ‘About Moveware’. Click on the ‘View Release Schedule’, and the ‘View Release Notes’ and users will be redirected to the Moveware Wiki.
Highlight #14: 359764 New System Parameter to Highlight the Branch Colour Column Based on Branch Setup
We have added a new System Parameter which allows Moveware to highlight the branch colour column, based on branch setup. This new functionality is applicable to the Daily Diary, Removals Search, Debtor Search and Creditor Search screens.
To utilize the feature, users will need to enable the System Parameter “To display branch column colour based on the branch setup” (Administration > System Setup > System Parameters).
Navigate to the Branch Management screen (Administration > Company Setup > Branches). The ‘Color’ field will appear. Double-click on the field to trigger the ‘Choose Color’ window. Select the colour for each Branch and click ‘OK’.
The colour of the field will change to the colour selected by the user. Save the change made to the Branch.
The colour setup will affect the Daily Diary, Removals Search, Debtor Search and Creditor Search screens. See below for examples.
System Parameter settings:
Code: HighlightBranchColor
Description: To display branch column colour based on the branch setup. Options: N = No, Y = Yes (Default = N)
Highlight #15: 366280 New System Parameter to Display Waybill Alerts on the Removal Search Screen NEW FUNCTIONALITY We have added a new System Parameter which allows alerts created in the Waybill module to also display on the Removal Search screen when users click on a Job/Removal linked to a waybill with alerts added. Users will be able to see both comments and notes added to each alert.
To utilize this functionality, the System Parameter “Removals Alerts to also display Waybill Alerts in Removal search screen” needs to be enabled (Administration > System Setup > System Parameters).
When a user adds a Waybill diary action called ‘Alert’ and types comments in the ‘Comment’ field (Waybills > Diary Tab), there will be a pop-up alert displaying the comments added to the diary action.
This alert will also be triggered in the following situations:
- When a user double-clicks on the Jobs/Removals linked from Waybill > Job Tab to open the Jobs Management screen
- When a user filters for Jobs/Removals linked to a waybill with an alert on the Removals Search tab
System Parameter settings:
Code: RemovalAlertInclWaybillAlert
Description: Removals Alerts to also display Waybill Alerts in Removals search screen
Options: Y – Yes (Show alert), N – No (Do not show alert) – Default = N
Highlight #16: 376335 New Data Only Excel Format for Account Balances, Balance Sheet, and Profit & Loss Reports
A new format for the data only Excel version of Account Balances, Balance Sheet, and Profit & Loss reports will show value details and their total summary in the same column.
Previously, when the reports were exported in the data only Excel format, the value details and total were shown in different columns, and with blank columns in between. Such format could be confusing for users to review data.
Users can now run the three reports in the data only Excel format by selecting ‘Data Only’ for Excel Output and the reports will show the detail values and total values in the same column making it more efficient to manipulate data in the reports.
- Balance Sheet
- Account Balances
- Profit & Loss
Setting: Excel Output: Data Only
Highlight #17: 377097 New System Parameter to Validate Both Service and Destination Types When Running the Job Type Creator
We have added a new System Parameter which validates both Service and Destination Type when running the Job Type Creator.
This System Parameter “Job Type Creator Validates Both Service and Dest Type” is set to N by default. This value does not make it mandatory for users to validate the Service and Dest Type fields when the Job Type Creator is run.
To enable the validation, set the value of the System Parameter to ‘Y’. (Administration > System Setup > System Parameters).
When running the Job Type Creator, users will be asked to validate the fields (1) Service and (2) Dest Type if they try to save the change without stating Service and Dest Type.
System Parameter settings:
Code: JTCValidateBothServiceDestType
Description: Job Type Creator Validates Both Service and Dest Type
Options: Y – Yes, N – No (Default = N)
Highlight #18: 336990-076P Post Out of Storage Invoices Directly to Debtors
We have added the ability to view the storage invoice created from the “Storage Out” invoice window. Users can also see the details and post the invoice directly to a debtor via the new pop-up window.
In Storage Management > Details, users can add charge lines, set the date out and click on the calculator button to calculate the charge and create a new invoice.
After an invoice is created, there will be a pop-up window asking users if they wish to view the invoice created.
If select ‘Yes’, the storage invoice created will be displayed in a new pop-up window. Users can navigate to the ‘Invoice’ tab to see details, manage, and post the invoice.
If select ‘No’, the window showing the new storage invoice will not be triggered and users can view the invoice later.